How does Spring autoconfiguration work?
In this tutorial, we will explain how Spring autoconfiguration works.
Creating a simple Spring Boot application
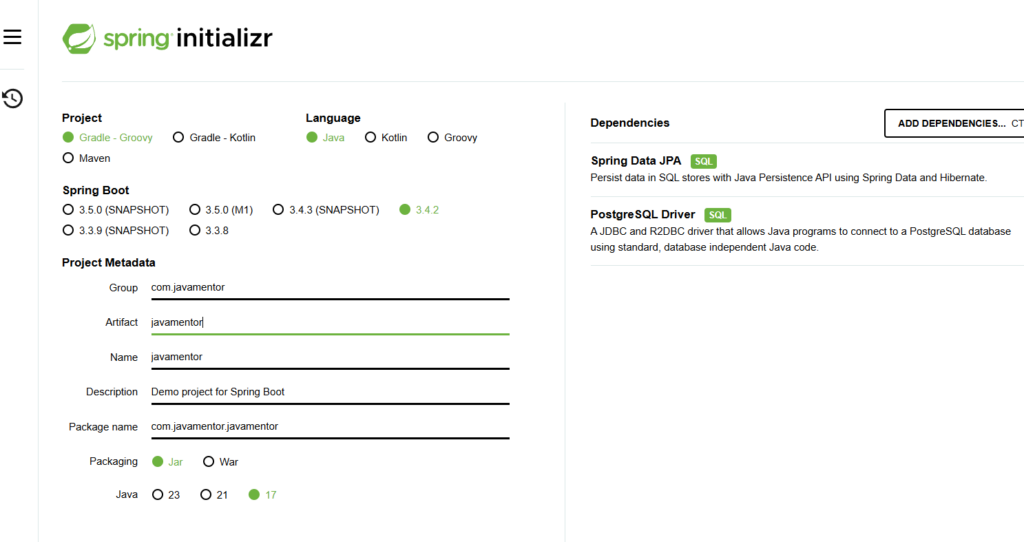
Let’s create a simple Spring boot application. We want to connect our application to the Postgres database using Spring and JPA. Go to the Spring Initializr website and create a simple app. Make sure to add Spring-JPA dependency and Postgres driver:
The last step is to update your application.properties file with the database properties:
spring.datasource.url=jdbc:postgresql://localhost:5432/javamentor
spring.datasource.username=javamentorusername
spring.datasource.password=javamentorpassword
spring.datasource.driver-class-name=org.postgresql.Driver
spring.jpa.hibernate.ddl-auto=update
spring.jpa.properties.hibernate.dialect = org.hibernate.dialect.PostgreSQLDialect
and your application is ready to connect to the Postgres database! But wait a second! Don’t we need to create a DataSource bean? No, Spring Boot creates and manages that bean for us. We learned about that in this tutorial. Today we want to see how Spring Boot does that autoconfiguration for us.
Let’s check out Gradle dependencies, the explanation is inside!
If we take a look at our build.gradle file, we will find two dependencies and two plugins related to spring:
plugins {
	id 'java'
	id 'org.springframework.boot' version '3.4.2'
	id 'io.spring.dependency-management' version '1.1.7'
}

dependencies {
	implementation 'org.springframework.boot:spring-boot-starter-data-jpa'
	runtimeOnly 'org.postgresql:postgresql'
}
io.spring.dependency-management plugin takes care of the dependency version(that all versions are compatible). org.springframework.boot is doing spring boot autoconfiguration work! We will explain how that plugin works. Dependencies are self-explanatory. We added a Postgres driver and spring-boot dependency for the data access using JPA.
When we added spring-data-jpa dependency on the classpath DataSource is “magically” configured. How does that work?
Let’s run gradle dependencies command to see all of our dependencies. One of the dependencies is org.springframework.boot:spring-boot-autoconfigure:3.4.2:
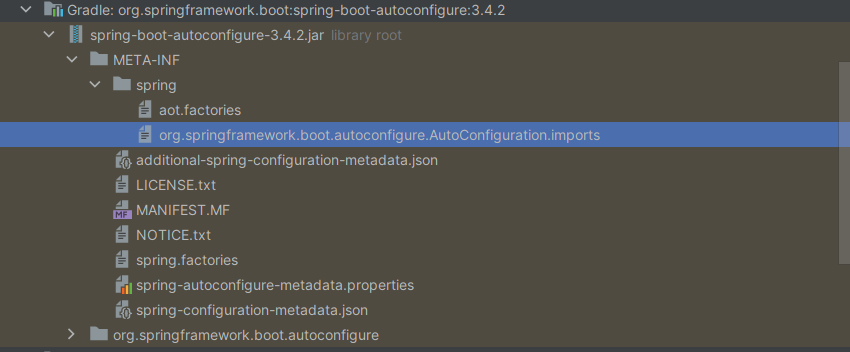
If you check the official Spring docs you will find the following: “Spring Boot checks for the presence of a META-INF/spring/org.springframework.boot.autoconfigure.AutoConfiguration.imports file within your published jar. The file should list your configuration classes”. We are looking for some configuration that configures our DataSource. One configuration inside the org.springframework.boot.autoconfigure.AutoConfiguration.imports is called DataSourceAutoConfiguration. Let’s open that class and see what is inside.
Understanding DataSourceAutoConfiguration class
Let’s start with the annotation applied on the class level: @ConditionalOnClass({ DataSource.class, EmbeddedDatabaseType.class }). The condition for this configuration is that both of those two classes are present on the classpath. This makes sense. You want to load configuration related to the data source only if some dependency that works with the database is in the classpath. If you have an application that has an API and communicates with Apache Kafka but doesn’t communicate with the database, you don’t want to load this config. That is why when we added org.springframework.boot:spring-boot-starter-data-jpa in our classpath, DataSource was configured. Let’s find where is DataSource configured inside the spring-data-jpa dependency.
If you go back to the output of your gradle dependencies command, you can see that spring-boot-starter-data-jpa has spring-boot-starter-jdbc dependency. spring-boot-starter-jdbc has com.zaxxer:HikariCP dependency. com.zaxxer:HikariCP contains a class called com.zaxxer.hikari.HikariDataSource that implements DataSource. And that is why DataSourceAutoConfiguration is loaded! Inside the DataSourceAutoConfiguration class there is an inner class:
	@Configuration(proxyBeanMethods = false)
	@Conditional(PooledDataSourceCondition.class)
	@ConditionalOnMissingBean({ DataSource.class, XADataSource.class })
	@Import({ DataSourceConfiguration.Hikari.class, DataSourceConfiguration.Tomcat.class,
			DataSourceConfiguration.Dbcp2.class, DataSourceConfiguration.OracleUcp.class,
			DataSourceConfiguration.Generic.class, DataSourceJmxConfiguration.class })
	protected static class PooledDataSourceConfiguration {

		@Bean
		@ConditionalOnMissingBean(JdbcConnectionDetails.class)
		PropertiesJdbcConnectionDetails jdbcConnectionDetails(DataSourceProperties properties) {
			return new PropertiesJdbcConnectionDetails(properties);
		}

	}
The interesting part here is that this inner class imports some pooled config: @Import({ DataSourceConfiguration.Hikari.class. Let’s open the declaration of that Hikari class:
	@Configuration(proxyBeanMethods = false)
	@ConditionalOnClass(HikariDataSource.class)
	@ConditionalOnMissingBean(DataSource.class)
	@ConditionalOnProperty(name = "spring.datasource.type", havingValue = "com.zaxxer.hikari.HikariDataSource",
			matchIfMissing = true)
	static class Hikari {

		@Bean
		static HikariJdbcConnectionDetailsBeanPostProcessor jdbcConnectionDetailsHikariBeanPostProcessor(
				ObjectProvider<JdbcConnectionDetails> connectionDetailsProvider) {
			return new HikariJdbcConnectionDetailsBeanPostProcessor(connectionDetailsProvider);
		}

		@Bean
		@ConfigurationProperties(prefix = "spring.datasource.hikari")
		HikariDataSource dataSource(DataSourceProperties properties, JdbcConnectionDetails connectionDetails) {
			HikariDataSource dataSource = createDataSource(connectionDetails, HikariDataSource.class,
					properties.getClassLoader());
			if (StringUtils.hasText(properties.getName())) {
				dataSource.setPoolName(properties.getName());
			}
			return dataSource;
		}

	}
Finally, we can see where Spring creates our DataSource! Feel free to put a breakpoint inside the dataSource method and start the application. Application will stop there during the booting time!
Application properties modification
If you want to customize the Hikari pool we can do that in the following way:
spring.datasource.hikari.connectionTimeout=30000
spring.datasource.hikari.idleTimeout=600000
spring.datasource.hikari.maxLifetime=1800000
and many other properties. It’s interesting to see that this spring.datasource.hikari prefix is defined in the config which we just looked at using @ConfigurationProperties(prefix = "spring.datasource.hikari"). When you set spring.datasource.hikari.connectionTimeout=30000 you set the value of the field named connectionTimeout on the class HikariDataSource. This information is very useful when you have some issues with your properties. It happens all the time that you change some property and nothing changes. If you want to debug what’s wrong now you know where to start. You need to find the configuration where that property is defined and just debug from there.
Is there any real-world example where we need to do autoconfiguration ourselves?
There is! The most common use case is if you develop a shared library and want to include some Spring Beans inside that library. Let me first show you one simple but awful code example that I saw at one application in my real job. I have worked on a project that had dependencies on three libraries. The main Spring class of that project looked like this:
@SpringBootApplication
@ComponentScan(basePackages = {"com.libraryjson", "com.libraryexcel"})
public class SpringBootApplication {

	public static void main(String[] args) {
		SpringApplication.run(SpringBootApplication.class, args);
	}

}
library code:
package com.libraryjson.spring;
import org.springframework.stereotype.Component;

@Component
public class JsonParser {
   //some irrelevant logic here
}
What the hell is that? It screams bad code. There are plenty of issues here:
- If the developers of the
libraryjson change their main package we would need to change our application as well. This is the high coupling between the library and our application. - If we add the new library we would need to add new packages to scan in our application. If we remove the library, we have to remove packages for that application.
- Many times a package in the library where spring beans are located is not a root package but maybe something like
com.libraryjson.spring. So, if you scancom.libraryjsonyou are just scanning more than needed. Waste of resources! - In those projects that follow bad practices, you will find package names that overlap(especially if you work in a corporation)! If you include two libraries with the package
com.libraryjsonand you try to scan beans in the way that we showed you are screwed. You are not even aware that both libraries have the same package. Maybe you wanted to include spring beans only from one of them!
What is the proper way to do this?
First of all, forget about component scanning in the libraries. You should define beans in the following fashion:
@Configuration
public class JsonLibraryConfig {

    @Bean
    public JsonParser jsonParser() {
        return new JsonParser();
    }
}
Then, you should do the same thing as Spring does in their code. Follow their best practices from their docs. Create META-INF/spring.factories file (I think that META-INF/spring/org.springframework.boot.autoconfigure.AutoConfiguration.imports) also works as well and inside that file put the following code:
org.springframework.boot.autoconfigure.EnableAutoConfiguration=\
com.libraryjson.spring.JsonLibraryConfig,\
Simple as that and your job here is done.
The last small detail
What if some clients of your library use Spring and other use pure Java? It seems like those clients that use pure Java would get some config they don’t need. The solution is trivial and elegant. Inside the libraryjson you should write the pure Java classes. For example: JsonParser, JsonDateFormat, JsonNamingStrategy, etc. Those are pure Java classes that hold the logic to parse JSON data. Then, you create a new project named spring-boot-starter-libraryjson. That project has libraryjson as a dependency. Inside spring-boot-starter-libraryjson you want to put JsonLibraryConfig class and that META-INF stuff. Now, whoever wants to include only pure Java classes can import libraryjson and those projects that want spring autoconfiguration can include spring-boot-starter-libraryjson library. Problem solved.
Further reading
If you want to learn more about Spring here are the good resources:
- Official Spring docs here, here and here. Those are amazing tutorials, best on the internet!
- If you want to learn spring step by step, Spring in Action is a great book!
- You can find more tutorials written by me here