Measure test coverage using Jacoco
In this tutorial, we will explain what test coverage is , and what is important regarding that topic. At the end we will show the measuring of test coverage using Jacoco.
What is test coverage and what is important about it?
Understanding what is important and what is NOT important in the test coverage, is the most important part of this article! All developers know how to set up a Jacoco and what test coverage is but a lot of them don’t know important things.
Test coverage percentage is JUST A NUMBER and it is not important at all!
I can understand why managers think test coverage percentage is important. The problem is that some developers agree with them. I saw many projects where test coverage was 90% and bugs were happening inside the code that was “covered”. I saw many tickets: “Improve test coverage to satisfy our target of 70% / 80% / 90%”. Those tickets are flawed on so many levels but let’s list two of them:
- Tests should be part of the original implementation. Avoid writing your code first and then adding tests later. Sure, we don’t live in an ideal world and sometimes we inherit some code where we want to write tests for the legacy code. In that case, we try to cover important branches of the code more than the test coverage number
- Writing tests only to increase the test coverage percentage number. I saw many useless tests written only to increase percentages but those tests never fail and test nothing. Many times those tests are testing getters, setters, and similar trivial things. Sometimes they look like they are testing something useful, but if you stop and think a bit more, you will realize those tests are pointless
You should create a test plan for your application and stick to the plan
For example, you can decide that your application will have three type of tests:
- End-to-end tests which cover everything from the API to the database
- Validation tests of your API(let’s say that you have some complex validation on your API and that is why you include those tests)
- Domain tests where you would test your domain(this is very important if you have a complex domain and follow Domain Driven Design).
The purpose of the Jacoco and test coverage is:
- To show us where we deviated from the plan
- Where we forgot to cover some parts of the code that we wanted to cover.
For example, if your colleague creates a pull request with the new domain classes, you can see in the Jacoco report if he missed covering the domain classes with the test. Let’s write the code and see Jacoco in action!
Coding time
Let’s follow the official Jacoco plugin tutorial:
plugins {
    id 'jacoco'
}

test {
    finalizedBy jacocoTestReport // report is always generated after tests run
}
jacocoTestReport {
    dependsOn test // tests are required to run before generating the report
}
jacoco {
    toolVersion = "0.8.12"
    reportsDirectory = layout.buildDirectory.dir('customJacocoReportDir')
}
jacocoTestReport {
    reports {
        xml.required = false
        csv.required = false
        html.outputLocation = layout.buildDirectory.dir('jacocoHtml')
    }
}
This is the basic gradle Jacoco config, it is enough for now. Let’s write one simple class and test for that class:
public class Calculator {

    public int add(int a, int b) {
        return a+b;
    }
    public int multiply(int a, int b) {
        return a*b;
    }
}

public class CalculatorTest {

    @Test
    public void addTest() {
        Calculator calculator = new Calculator();
        assertThat(calculator.add(2,3)).isEqualTo(5);
    }
}
I intentionally “forgot” to write the test for the multiply method. Let’s discover this bug using Jacoco. Let’s run the gradle build command. After the build is over a new folder is created:
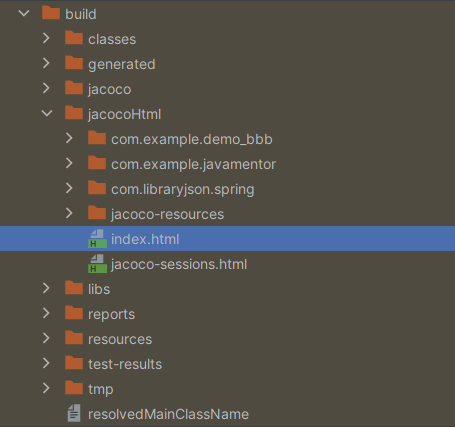
Let’s open the highlighted HTML file to see the report:

You can see the total coverage for our project is 34%. Also, there you can see coverage measured per package. If we click on the package com.example.javamentor and then click on our Calculator class, and then click on the add method we will see the following screen:
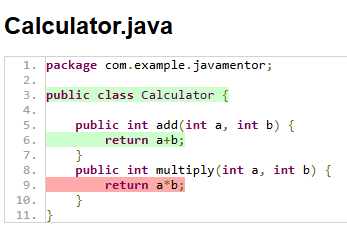
You can see that the tested method is marked with green and not tested marked with red. Jacoco is just a helper tool showing us which lines are not covered. You can see here that part of our domain(multiply method) is not tested so we should write a test. I need to repeat: Don’t write tests just to improve the percentage!
More custom configuration
The last two things that you will need for sure are how to exclude certain classes from the test report and how to set a violation rule. If we break the violation rule our gradle build will fail!
def afterEvaluate = {
	classDirectories.setFrom(files(classDirectories.files.collect {
		fileTree(dir: it, exclude: [
				"com/**/*Config.*",
		])
	}))
}

jacocoTestReport {
	reports {
		xml.required = false
		csv.required = false
		html.outputLocation = layout.buildDirectory.dir('jacocoHtml')
	}
	configure afterEvaluate

}

jacocoTestCoverageVerification {
	violationRules {
		rule {
			limit {
				minimum = 0.5
			}
		}
	}
	configure afterEvaluate
}
check.dependsOn jacocoTestCoverageVerification
We excluded all classes with the suffix *Config which are inside any package of the com package. Also, we specified that we want our build to fail if the test overage percentage is under 50%.
Further reading
If you want to learn more about testing, those resources are the best:
- Detailed theoretical explanation and practical implementation of the Test Pyramid is on the Martin Fowler blog here
- Great presentation regarding testing in microservices
- Chapter “Testing Patterns” in the Microservices Patterns book by Chris Richardson
- Testing category on my blog